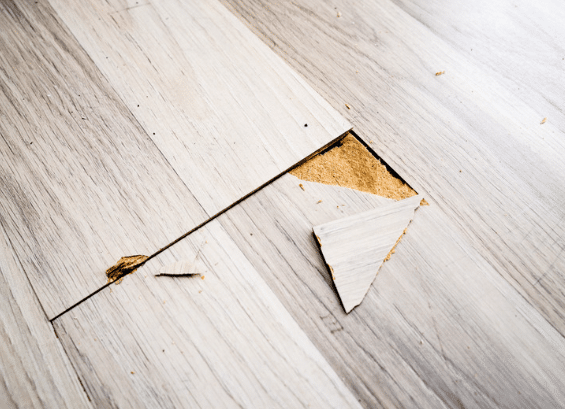
A damaged plank can ruin the clean and uniform appearance of your floor. Whether it’s from moisture, cracks, or scratches, even one issue can lead to bigger problems. Replacing a damaged board in a laminated floor helps protect your home’s value.
This step-by-step guide clearly and simply explains the entire process. You will learn how to remove the damaged board, choose the right replacement, and install it correctly without needing expensive tools or professional help.
You will also discover how to match the new board with your current floor, avoid common mistakes, and prevent future damage. If you want your laminate flooring to look flawless again, follow this guide and take action today.
Understanding Laminate Flooring
Laminate flooring comprises layered materials, including a strong wear layer, a printed design, a dense core, and a backing that resists moisture. Each plank connects using a locking system, which makes floorboard repair easier without removing the entire surface.
Most homes use the floating floor method, where laminate planks snap together without nails or glue. This setup rests over an underlayment and allows for easy replacement when needed. It’s also why replacing a damaged board in a laminated floor is a practical do-it-yourself task.
Damage usually happens from water spills, furniture scratches, or heavy impacts. Knowing how these floors are built helps you avoid further problems. When it’s time to fix one area, understanding the structure enables you to do a proper and lasting floorboard repair.
Tools and Materials Needed for Replacing Laminate Floor Boards
Gather all the tools and supplies beforehand to keep the replacement process smooth and efficient from start to finish.
Tools
- Utility knife
- Circular saw or oscillating multi-tool
- Chisel and hammer
- Tapping block and pull bar
- Measuring tape
- Pencil
- Safety glasses and gloves
Materials
- Replacement laminate board
- Wood glue (if needed)
- Color-matching putty
- Clean cloth and vacuum
These are essentials for effectively replacing a damaged board in a laminated floor without harming surrounding planks.
Preparing for the Laminate Floorboard Replacement
Before jumping into repairs, getting your space ready keeps things smooth and safe. A few simple steps make your laminate plank replacement easier and more efficient.
1. Clear the Area and Wear Protective Gear
Move furniture, rugs, and clutter away from the floor. Wear gloves and eyewear to stay safe during laminate floor repair and when handling sharp or broken planks.
2. Find the Damaged Board and Check Its Location
Look closely at where the broken laminate board sits. If it’s near a wall, your floor repair might be simpler than a board in the center.
3. Let the New Board Adjust to the Room
Place your replacement board in the room for 24 hours. This helps it match the room’s temperature and humidity for a better fit during installation.
A few minutes to prepare your workspace sets you up for a smoother and safer floor repair. Now, you're ready to move on and remove the damaged plank.
Step-by-Step Guide to Replacing a Damaged Laminate Floor Board
When replacing a damaged board in a laminated floor, depending on how accessible the damaged area is, choose between full disassembly or a single-board cutout.
Option 1: Removing Boards from the Wall to the Damaged Area
This method is best when the damaged board is near the wall or when you cannot safely cut in the middle.
- Step 1: Remove Baseboards: Carefully pry off the baseboards near the affected area with a pry bar or putty knife. Be gentle to avoid damaging the wall.
- Step 2: Disassemble Flooring: Lift each board from the wall inward until you reach the damaged piece. Remember the order so you can reinstall it correctly.
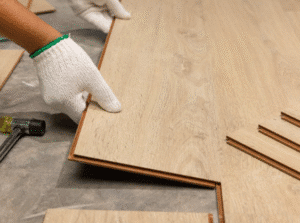
- Step 3: Replace Board: Install the new laminate plank where the damaged one was. Make sure the click-lock edges fit tightly with the surrounding boards.
- Step 4: Reassemble Flooring: Return the removed boards in the same sequence. Use a tapping block and pull bar to lock them securely into place.
- Step 5: Reattach Baseboards: Nail or glue them back in their original position. Wipe away any dust or glue that may have spilled.
Option 2: Replacing a Single Board Without Removing Others
This technique works well if the damaged board is in the center and you want to avoid removing other planks.
- Step 1: Mark and Cut: Draw a rectangle inside the damaged board, about half an inch from each edge. Use a circular saw to cut along these lines. Set the blade depth to match the board's thickness.
- Step 2: Remove Damaged Pieces: Pry up the cut sections with a chisel. Be careful not to damage the tongue and groove parts of nearby boards.
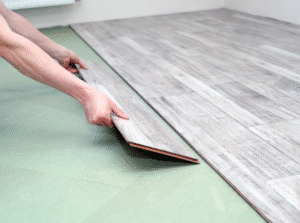
- Step 3: Prepare Replacement Board: Trim off the new plank's bottom groove edges. Apply wood glue along the trimmed edges to hold them in place.
- Step 4: Insert New Board: Carefully drop the board into the open space. Press down firmly so the glue bonds well with the surrounding planks.
- Step 5: Clean Excess Glue: Wipe any glue that seeps out with a damp cloth. Let the repair set for at least 24 hours before walking on it.
Final Steps After Replacing a Damaged Laminate Floorboard
After placing the new laminate board, give the floor a final check. These simple steps help make sure your floorboard repair lasts a long time.
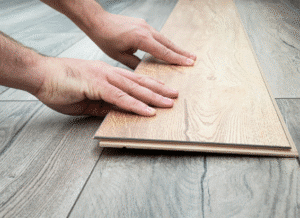
1. Press Gently on the Corners to Check for Movement
Test the new laminate plank by pressing each corner. It should stay flat, even with nearby boards, with no gaps or bouncy spots.
2. Clean the Entire Floor Surface After Repair
Sweep or vacuum the repaired area to remove sawdust and debris. A clean floor keeps the locking system tight and helps avoid surface scratches.
3. Watch the New Board for Shifting or Glue Failure
Over the next few days, check if the board stays level. Movement could mean a weak connection or glue not holding under the floating floor system.
Maintenance Tips and Preventing Future Laminate Floor Damage
Taking care of your floor after repairs helps protect your investment. These easy tips help extend the life of laminate flooring and prevent new damage from happening again.
1. Use Protective Pads on Furniture Legs
Stick felt pads under chairs, tables, and heavy furniture. This keeps sharp edges from scratching laminate planks and helps reduce dents from frequent movement or pressure.
2. Control Moisture in Humid Areas
Place a dehumidifier in damp rooms to protect the floor. Too much humidity can cause the laminate core to swell or shift over time, weakening the structure.
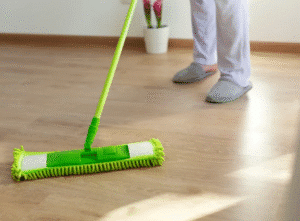
3. Clean Regularly to Avoid Scratches
Dirt and grit can wear down your laminate’s surface. Vacuum or sweep every few days to keep the top layer smooth and free from small particles.
4. Avoid Standing Water While Mopping
Use a lightly damp mop when cleaning. Excess water can slip between the seams, weaken the core, and loosen the locking system under the floating floor.
Taking these steps helps your floor stay in good shape for years. With regular care, you may never need to replace a damaged board in a laminated floor again.
Frequently Asked Questions
How do I match the new board to my existing flooring?
If leftover laminate planks from your original flooring are available, use them. If not, check the box for product codes or contact the store to find the same color and texture.
How long should I wait before walking on the newly replaced laminate board?
It’s best to wait 24 hours after replacing a damaged board on a laminated floor. This gives the adhesive time to dry and lets the new plank settle firmly.
How do I ensure the new board is level with the existing flooring?
Use a ruler or straight edge to check that the replacement plank is even with the surrounding boards. Apply gentle pressure during installation to keep everything flush and tight.
Do I need to glue the new laminate board in place?
If you're using a cut-and-replace method, glue is often required. The boards usually lock together for floating floors and don’t need adhesive unless the original setup uses glue.
Conclusion
Replacing a damaged board in a laminated floor does not require professional training. With the right tools and a little patience, you can restore your floor and improve its overall look.
If you have been putting off the repair, now is a great time to get it done. A fast replacement protects nearby boards from damage. For a smooth, polished finish, explore our refinishing services in Fort Worth, TX, for trusted and affordable help.
Good habits can make your floors last longer. Clean regularly, avoid standing water, and use felt pads under furniture. Fort Worth Refinishing is always ready to help with expert care when you need more than a simple repair.
End Note
At Fort Worth Refinishing, we specialize in restoring worn and damaged surfaces so they look fresh and new again. Whether you need bathtub refinishing, shower refinishing, or any of our complete refinishing services, we aim to give you beautiful results without the high cost of full replacement.
We’re proud of our work and invite you to see it for yourself in our gallery. You can also browse customer reviews to hear from real homeowners we’ve helped. If you want to know more about our values and experience, visit the About Us and Our Philosophy pages. We also offer trusted bathroom vanity refinishing services to complete your space.
We serve many nearby communities with the same level of care and quality. See our complete list of areas we serve to find out if we’re working in your neighborhood. For helpful tips and inspiration, check out our Blog posts, and follow us on Facebook for more updates. Send us a message now through our Contact Us page. We’re always here to help.
Fort Worth Refinishing
2627 S Cooper St Suite E12, Arlington, TX 76015, United States
+18176339100