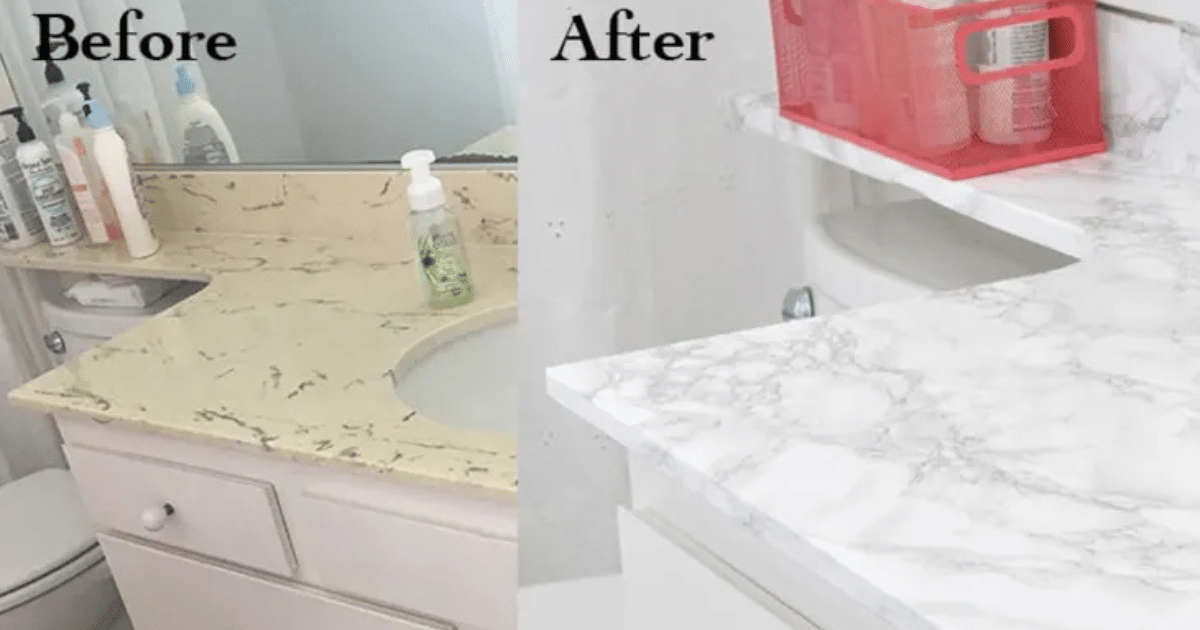
Learning how to resurface kitchen countertops without ripping them out is easier than you might think. The process involves cleaning, sanding, fixing any damage, applying a new finish, and sealing the surface. It’s a budget-friendly way to upgrade your kitchen and make your old counters look fresh and stylish.
In this guide, we will walk you through each step using tools and materials that are easy to find. Whether you want to hide scratches or give your space a new vibe, resurfacing is a smart way to get results without the high replacement cost. No special skills are needed. You just need the right preparation and a little patience.
Why Resurfacing Your Kitchen Countertops Is a Smart Move
Thinking about updating your kitchen? If you want to save money and refresh your space, learning how to resurface kitchen countertops is one of the smartest choices you can make.
The Cost-Saving Advantage vs. Full Replacement
Replacing countertops can cost thousands, but resurfacing saves you a lot of money. There’s no need to tear anything out or pay for major labor. It’s a budget-friendly upgrade that works.
Environmental & Aesthetic Benefits
Resurfacing your countertops reduces landfill waste since you're reusing what you already have. It's also a great way to give your kitchen a fresh, modern look without a full renovation.
Ideal Countertop Types for Resurfacing
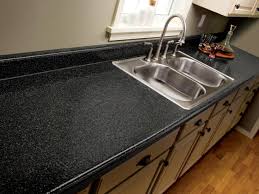
The best countertops for resurfacing are laminate, tile, wood, or certain solid surfaces. Natural stones like granite or quartz are tricky, but a professional can help if needed. Resurfacing is a simple way to make your kitchen look new and modern without spending a lot or making a big mess. It's a smart and earth-friendly choice, too.
Tools & Materials Needed Before You Start
If you want to learn how to resurface kitchen countertops the right way, you will need to have the right tools. Having everything ready will help you work faster and avoid mistakes.
Basic Tools Checklist
- Orbital sander: Smooths out the surface for better product bonding
- Painter’s tape: Protects nearby walls, sinks, and edges
- Putty knife: Fills cracks, chips, or holes in the surface
- Screwdrivers: Remove fixtures or attachments before starting
- Drop cloths: Keep your floors and cabinets clean from dust and drips
- Clean rags: Wipes down surfaces after each step for a clean finish
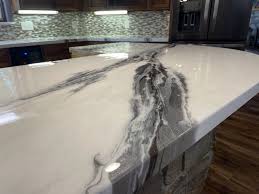
Choosing the Right Resurfacing Products (Epoxy, Resin, Concrete overlays, etc.)
If you're trying to learn how to resurface kitchen countertops, choosing the right product is really important. Epoxy gives a shiny, stone-like look. Concrete overlays are smooth and modern. Resins work best for surfaces that need extra strength and durability.
Safety Equipment & Precautions
Safety is a must when resurfacing. Always wear gloves, goggles, and a face mask to protect against dust and fumes. When using epoxy or resin products, ensure your workspace is open and well-ventilated.
How to Resurface Kitchen Countertops: Step-by-Step
Knowing how to resurface kitchen countertops can help you give your kitchen a brand-new look without replacing anything. Just follow these simple steps to get smooth, lasting results.
Step 1 – Cleaning and Degreasing the Surface
Use a degreaser and a scrub sponge to clean the surface really well. Remove all oils, stains, and dirt so the new finish can stick properly.
Step 2 – Sanding the Existing Countertop
Use medium-grit sandpaper to lightly sand the surface. The rough surface helps the primer and resurfacing material stick better and last longer.
Step 3 – Patching and Repairing Cracks or Dents
Fill any cracks or dents with wood filler or resin patch. Let it dry completely, then sand smooth for an even finish.
Step 4 – Priming the Surface
Apply a bonding primer evenly across the surface. This step helps the resurfacing material grip and adds durability to the final finish.
Step 5 – Applying the Resurfacing Material (with drying times)
Apply the resurfacing product in layers. Make sure to follow the steps carefully and let each layer dry all the way before putting on the next one.
Step 6 – Sealing and Finishing Touches
Once dry, add a protective sealant. This shields the surface from stains, water, and heat for long-lasting results.
Optional – Painting or Adding Decorative Finishes
Add style with marble patterns, stone textures, or solid colors. Use countertop-safe paint for the best results and long wear.
You don’t need to be a pro to get professional-looking countertops. Just take your time, follow each step, and enjoy your new kitchen look.
Common Mistakes to Avoid When Resurfacing Countertops
If you're learning how to resurface kitchen countertops, knowing what not to do is just as important as knowing the right steps. Avoid these common mistakes for a long-lasting finish.
Skipping Surface Preparation
One of the worst things you can do is forget to clean and sand the surface. The new finish may peel, bubble, or wear off quickly if the surface is not prepped right.
Not Using the Correct Products
Using regular paint or cheap materials can ruin the project. Always choose resurfacing products made specifically for countertops to make sure they last through heat and daily use.
Inadequate Drying Time Between Steps
If you don’t let each layer dry enough, it won’t stick well and might not last. Give each layer enough time to fully cure before adding the next one or sealing the surface.
Being careful with each step helps your resurfaced countertops look better and last longer. Take your time and trust the process, it’s worth it in the end.
DIY vs Professional Kitchen Countertops Resurfacing – What’s Best?
When considering resurfacing kitchen countertops, one big decision is whether to do it yourself or hire a pro. Each choice has good and bad sides, depending on how much you want to spend and what you need.
| Factor | DIY Resurfacing | Professional Resurfacing |
| Best For | Simple layouts, laminate or tile surfaces | Complex shapes, detailed edges, high-end finishes |
| Skill Level Needed | Basic handyman skills | No effort on your part, pros handle everything |
| Tools Required | Sander, putty knife, primer, resurfacing kit | All tools and materials are included in the service |
| Finish Quality | Good if done right, but results can vary | Smooth, durable, and consistent professional-grade finish |
| Time Commitment | 2–3 days, depending on drying times | Usually completed within 1–2 days |
| Cost Range | $100–$30,0 depending on the products used | $500–$1500 depending on size and material |
| Durability | It can stay nice for several years if you take good care of it. | Typically lasts longer and holds up better to daily wear |
How Long Does It Last? Durability & Maintenance Tips
After learning how to resurface kitchen countertops, you might wonder how long the results will last. The good news is that with the right care, resurfaced countertops can stay beautiful for many years.
What Affects the Lifespan of Resurfaced Countertops
Several factors can impact the lifespan of your resurfaced countertops, including exposure to heat, moisture, and the frequency of use. Quality products and proper preparation work are essential if you're learning to resurface kitchen countertops.
Tips to Extend the Life of Your Refinish
To make your refinished countertops last longer, always use cutting boards when chopping and avoid placing hot pans directly on the surface. Resealing every few years also helps keep the finish looking fresh and protected.
Cleaning and Daily Use Guidelines
Clean your resurfaced countertops with gentle soap and a soft cloth. Don't use strong cleaners or rough sponges because they can leave scratches on the surface. Keeping it clean regularly will help maintain the look and finish longer.
Taking a few simple steps to protect your counters can make a big difference. With proper maintenance, your resurfaced kitchen countertops can stay strong, stylish, and functional for a long time.
Frequently Asked Questions
Can you resurface any type of kitchen countertop?
Yes, you can resurface most types of kitchen countertops, including laminate, tile, wood, and even cultured marble. Hiring a professional for lasting results is best if you’re looking to resurface kitchen countertops made of natural stone like granite.
What is the easiest way to resurface kitchen countertops?
The easiest way to resurface kitchen countertops is by using a resurfacing kit that includes epoxy or resin. These kits come with clear steps and tools, making the process simple for anyone learning how to resurface kitchen countertops at home.
How long does it take to resurface countertops?
On average, resurfacing countertops takes about 2 to 3 days. This includes drying time between coats if you’re doing it yourself, and learning how to resurface kitchen countertops, so set aside a full weekend to complete the process properly.
Is countertop resurfacing worth it?
Yes, resurfacing is definitely worth it. It's an affordable way to make your kitchen look new without removing old countertops. If you’re exploring how to resurface kitchen countertops, it’s one of the smartest upgrades for homeowners looking to boost value and style.
What's the difference between resurfacing and refinishing?
Resurfacing means adding a brand-new surface layer like epoxy, resin, or concrete overlay. Refinishing often just involves repainting or sealing the existing surface. Learning how to resurface kitchen countertops is a better option if you want a full transformation.
Conclusion
Want to update your kitchen without spending a lot of money or making a big mess? Resurfacing is one of the smartest ways to do it. If you’ve been searching for how to resurface kitchen countertops, you now know it’s simple, affordable, and effective. It’s a great option for anyone who wants to refresh their kitchen on a budget.
With the right prep and materials, resurfaced countertops can last for years and still look amazing. You don’t need to spend thousands on brand-new counters when resurfacing can give you the same beautiful results. Whether you're aiming for a modern finish or just want to fix up worn surfaces, this project adds serious value to your home.
Ready to get started? Fort Worth Refinishing is your trusted local expert for bathtub, shower, and countertop refinishing services in Fort Worth, TX. We specialize in helping homeowners like you transform outdated spaces into stunning showpieces. Contact us today to schedule your free quote and easily bring new life to your kitchen.
End Note
Want a stunning kitchen transformation without the cost of a full remodel? Fort Worth Refinishing is your trusted local expert for professional refinishing services in Fort Worth, TX. We specialize in resurfacing kitchen countertops, bathtubs, showers, bathroom vanities, and tile surfaces. From chip repair to full refinishing, our complete range of Services is designed to restore beauty, extend surface life, and save money. All of it is backed by expert craftsmanship that lasts.
Whether you're dealing with chipped laminate or want a bold new look, we’ve got you covered. From shower refinishing to bathtub and bathroom vanity resurfacing, our services are available across all Areas We Serve. Explore our project gallery and read what happy customers have to say on the reviews page.
We take pride in our philosophy of delivering honest, reliable work that adds beauty and value to your home. Learn more About Us, follow us on Facebook, or check out our latest tips on the Blog. Ready to get started? Contact us today to schedule your free consultation and give your kitchen the makeover it deserves.