
Resurface kitchen countertops to transform your space without the high costs or hassle of a full remodel. This popular DIY project is an ideal choice for refreshing your kitchen’s look on a budget. Unlike a complete countertop replacement, resurfacing offers both affordability and the flexibility to personalize, letting you craft a style that’s uniquely yours.
Imagine a kitchen update with your favorite colors and finishes, all without major expenses or mess. Resurfacing provides a functional, stylish upgrade that breathes new life into your space.
Ready to learn how? Let’s dive into this guide to resurface kitchen countertops and achieve a fresh, modern look without the disruption of a full renovation.

Why Resurface Kitchen Countertops?
Kitchen countertops are the heart of any cooking space, combining style and practicality. Over time, they can get scratched, stained, or look outdated. Instead of paying for a pricey and time-consuming replacement, resurfacing offers an easy, budget-friendly way to bring them back to life.
Cost Savings Compared to Replacement
One of the most compelling reasons to resurface kitchen countertops is cost efficiency. Replacing countertops means paying for new materials, labor, and possible adjustments, which can add up fast. With resurfacing, you can get a fresh, updated look for much less by working with what’s already there. This approach saves money while still giving your kitchen a beautiful transformation.
Environmental Benefits of Reusing Materials
Choosing to resurface kitchen countertops is a smart, eco-friendly option. Instead of throwing out your old countertops, resurfacing lets you refresh them, cutting down on waste. This sustainable choice helps save resources and reduces the environmental impact of home upgrades.
Ability to Customize with New Finishes and Colors
When you resurface kitchen countertops, you’re giving your space a stylish update without breaking the bank. It lets you pick from a wide range of finishes and colors, so you can go for a modern, simple look or add bold patterns and colors. Plus, you can easily keep up with trends without making a big, long-term commitment.
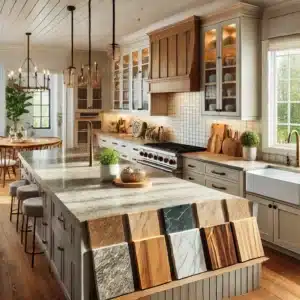
Types of Countertop Resurfacing Options
Resurfacing comes in different styles to match various looks and needs. Here are some popular countertop resurfacing options, each with its own pros and cons.
Paint and Sealant
Applying paint and sealant is an ideal choice for reviving laminate or wood surfaces. It’s budget-friendly and easy enough for a DIY project. This method involves sanding the surface, adding paint, and finishing with a sealant to make it strong and long-lasting.
Pros:
- Affordable with low costs.
- Quick refresh with many color choices.
- Easy DIY option.
Cons:
- Not as durable as other materials, needs upkeep.
- Limited to surfaces that hold paint well.
Concrete Overlay
A concrete overlay can give a sleek, modern look. It involves spreading a thin concrete layer over your existing surface for an industrial, contemporary feel – great for minimalist kitchens.
Pros:
- Durable and handles heavy use.
- High-end, modern finish.
- Customizable with stains or color pigments.
Cons:
- Can be messy and require professional help.
- Takes time and skill to apply correctly.
Epoxy Resin
Epoxy resin creates a glossy, durable finish that can look like stone or marble. It’s a great choice if you want a high-end look without the cost of real stone.
Pros:
- High-gloss, stain-resistant finish.
- Withstands moisture and heat well.
- Can mimic stone, marble, and other materials.
Cons:
- Application can be tricky and needs precision.
- May develop a yellow tint over time with sunlight exposure.
Tile Overlay
Applying a tile overlay adds texture and color. You can put tiles directly over your current countertop for a fresh look with unique patterns or simple, clean designs.
Pros:
- Wide variety of styles, colors, and textures.
- Great for custom patterns.
- Durable, handles heat and spills well.
Cons:
- Grout lines require regular cleaning.
- Installation takes more time than other options.
Resurfacing kitchen countertops is a great way to save money, reduce waste, and refresh your kitchen’s style. Each method offers unique benefits, so you can choose the one that fits your style and needs, whether it’s a sleek concrete look, a glossy epoxy finish, or a timeless tile design.
Materials and Tools Needed
Getting the right materials is essential for a smooth resurface kitchen countertops. With the right supplies and tools, you can make the job easier and achieve a great result.
List of Essential Materials
Before starting the project, make sure you have the following essential materials:
- Countertop Paint: Use paint made for countertops for a durable, lasting finish.
- Epoxy Coating: Adds a glossy, protective layer that’s tough and long-lasting.
- Sandpaper: Have a mix of coarse and fine grit to prep, smooth, and finish the surface.
- Sealant: A quality sealant protects your new surface from water and wear.
- Primer: Depending on your material, primer may help paint stick better.
Basic Tools
Having the correct tools on hand will make the resurfacing process more manageable and efficient. Include the following in your toolkit:
- Paintbrush: For detail work around edges and corners; different sizes add flexibility.
- Paint Roller: Covers large areas smoothly and fast.
- Electric Sander: Perfect for smoothing the surface and removing imperfections.
- Tarp or Plastic Sheeting: Protects surrounding areas from dust and paint spills.
- Painter’s Tape: Masks off areas you don’t want to be painted.
- Protective Gear: Wear gloves, goggles, and a mask for protection from dust and fumes.
Step-by-Step Guide to Resurfacing Kitchen Countertops
Ready to give your kitchen countertops a fresh look? Follow these simple steps for the best results.
Step 1: Clean and Prep the Surface
Start by cleaning your countertop well. Use warm water and a mild detergent to remove grease, grime, and any dirt that might prevent the new surface from sticking. Make sure the surface is completely dry before moving to the next step. For extra sticky spots, a degreaser can help get the countertop extra clean.
Step 2: Sand and Smooth the Surface
After cleaning, begin sanding the countertop. Use coarse-grit sandpaper first to remove the glossy top layer, helping the new materials stick better. Then, switch to finer-grit sandpaper to make the surface smooth. Once finished, wipe down the countertop with a damp cloth to remove any dust.
Step 3: Apply Primer (if needed)
Check if a primer is recommended for your resurfacing product. Primer helps the new layer bond to the old surface. Apply it evenly over the countertop with a brush or roller, aiming for a smooth, streak-free finish. Let the primer dry fully according to the label’s instructions.
Step 4: Add the Chosen Resurfacing Material
Now, it’s time to put on your chosen resurfacing material. If you’re using countertop paint or epoxy resin, follow the manufacturer’s instructions closely. Use a roller for smooth coverage on large areas and a brush for edges or tight spaces. Apply thin, even coats and give each coat plenty of time to dry to avoid streaks or bubbles. You may need to add several coats for full coverage.
Step 5: Seal and Finish
To protect your new countertop, apply a sealant once everything is completely dry. This adds durability and makes it more water-resistant. Follow the sealant’s instructions, spreading it evenly over the surface. Let it dry fully before you start using the countertop again.
After these steps, your kitchen countertops will have a fresh, updated look that boosts both style and function. Though it takes some time, this DIY project is a rewarding, budget-friendly way to transform your kitchen. Enjoy the results of your hard work!
Tips to Avoid Common DIY Mistakes
Achieving a professional finish can make your resurface kitchen countertop project look like new. For those taking on a resurfacing project, a polished and enduring finish is essential to ensure the countertop not only looks appealing but also remains functional. To get a professional look, start by avoiding some common DIY mistakes.
- Proper Surface Prep: Skipping surface prep is a big mistake. Make sure to clean and sand the countertop well to remove all dirt, grease, and debris so the new surface sticks properly.
- Mixing Materials Correctly: Follow the instructions exactly when mixing compounds. Incorrect mixing can lead to uneven surfaces or weak spots.
- Good Ventilation: Working in a space with good airflow helps finishes cure properly and keeps you safe from fumes. Keep windows open or use a fan for ventilation.
- Respect Curing Times: Rushing the curing process is a common error. Each product has a recommended curing time, from 24 hours to several days. Letting the finish cure fully is key to making it durable.
- Apply Evenly and Smooth Out Bubbles: Use a roller or brush made for smooth application, spreading the resurfacing compound evenly. If bubbles appear, smooth them out right away with a brush or roller. Taking your time with each layer helps create a flawless, long-lasting finish.
Maintenance Tips for Resurfaced Countertops
Keeping your resurfaced kitchen countertops in good shape is easy with a few simple care steps. Here’s how to easily include it in your daily routine:
- Use Mild Cleaners: Stick to gentle, non-abrasive cleaners to avoid scratching. A mix of warm water and mild dish soap works great.
- Soft Cloths or Sponges: Use soft cloths or sponges to clean the surface. Avoid metal scrubbers or scouring pads, which can scratch the finish.
- Clean Up Spills Right Away: Quickly wipe up spills, especially from things like wine, citrus juice, or vinegar, to prevent stains or damage.
Following these simple steps will help keep your countertops looking shiny and new for years to come.
Do's and Don’ts for Preserving the Look Over Time
Preserving the appearance of your resurfaced countertops requires mindful usage and care practices. Here are some key do's and don'ts to keep in mind:
Do's:
- Use Cutting Boards and Trivets: Always place cutting boards to avoid scratches and use trivets under hot pots and pans to protect the surface from heat damage.
- Maintain Regular Cleaning Schedule: Consistent weekly cleanings help to remove buildup that could potentially harm the finish.
- Apply Protective Sealers Periodically: If your countertop type allows, applying a protective sealer every few years can help preserve its shine and resistance to stains.
Don’ts:
- Avoid Harsh Chemicals: Steer clear of bleach or ammonia-based cleaners, as they may erode the finish over time.
- Don’t Allow Liquid Accumulation: Standing water can seep into seams or under protective coatings, leading to softening or lifting of the surface.
- Prevent High Impact: Avoid dropping heavy objects on the counter, which could cause chips or cracks.
By following these simple do’s and don’ts, you can make your resurfaced kitchen countertops last longer and keep them looking great. Putting care into your DIY project and paying attention to details can truly transform your kitchen. Regular maintenance will help keep your refreshed countertops looking beautiful and functional for years. With a little planning and ongoing care, your countertops will stay a shining example of your hard work and creativity.
Frequently Asked Questions
How long does countertop resurfacing last?
Countertop resurfacing is a cost-effective way to refresh your kitchen without the expense of a full replacement. On average, a well-applied countertop resurfacing can last between 5 to 7 years, depending on usage and maintenance. High-quality application and proper care can extend the lifespan even further. Regular cleaning and avoiding harsh abrasives will help maintain the look and integrity of the resurfaced surface, ensuring it remains appealing for years.
Do countertop refinishing kits work?
Countertop refinishing kits available in the market can be quite effective when used correctly. These kits are designed for those who wish to undertake a DIY project and want a quick, budget-friendly kitchen update. The effectiveness largely depends on the preparation and application process. Following the instructions carefully is crucial to achieving a high-quality finish. Users have successfully used them to cover stains, marks, and minor damages, providing their countertops with a renewed look.
What is the best way to make a countertop look new again?
To make a countertop look brand new, preparation is key. Start by thoroughly cleaning the surface to remove any grease and dirt. Sand the countertop lightly to ensure the new surface material adheres properly. Apply a primer, followed by the resurfacing coat, and finish with a sealant to protect the new surface. For those not inclined towards DIY, a professional service can offer pristine results with the added benefit of expertise in material choice and application techniques.
Is refinishing countertops better than replacing them?
Refinishing countertops is often a better option than replacing them, especially when working within a budget. The cost is significantly lower, and the process is less disruptive to daily life. Refinishing also offers the opportunity to modernize the look of your countertops without the environmental impact of disposing of old materials. However, if the structural integrity of your countertops is compromised, replacement might be necessary.
How to refresh my kitchen without changing countertops?
You can refresh your kitchen without changing the countertops by painting the cabinets for a fresh look, upgrading the hardware for a modern feel, adding a stylish backsplash to create a focal point, and changing lighting fixtures to improve ambiance. These small updates can make a big impact, giving your kitchen a new life without a high cost.
Conclusion
Resurfacing kitchen countertops is a fantastic way to give your kitchen a fresh, updated look without the cost and hassle of a full remodel. It’s an ideal option for homeowners wanting a quick transformation that’s both budget-friendly and visually impactful. By choosing to resurface kitchen countertops, you’re not only enhancing your space’s style but also extending the life of your countertops with a durable, new finish.
This DIY project can also be a highly rewarding experience, giving you the chance to put your personal touch on the heart of your home. However, if you’d prefer to have a professional handle the work or need expert guidance, Fort Worth Refinishing is the best countertop refinishing company in Arlington, TX. Our experienced team ensures a flawless finish, providing the peace of mind that comes with quality craftsmanship.
With this guide and the right resources, you’re ready to take the next step in upgrading your kitchen. Whether you tackle it yourself or seek professional help, resurfacing your countertops is a practical and stylish way to refresh your kitchen space. Enjoy the satisfaction of transforming your kitchen into a beautiful and functional area you’ll love for years to come.
End Note
At Ft. Worth Refinishing, we’re passionate about transforming your spaces with our expert bathtub, shower, and countertop refinishing services. Discover the quality and craftsmanship we offer by visiting Our Services and Gallery pages, where you can see stunning before-and-after transformations that showcase our dedication to excellence.
We are proud to serve in Forth Worth, TX areas, so check out our Areas We Service to see if we’re in your neighborhood. Our mission is to provide high-quality refinishing solutions tailored to your needs. Learn more about who we are and what drives us on our About Us page.
Stay in the loop with our latest tips, trends, and project highlights by following our Blog and connecting with us on Facebook. We’d love to help you refresh your space, so don’t hesitate to reach out through our Contact Us page. At Ft. Worth Refinishing, your satisfaction is our top priority, and we’re excited to help you create the beautiful spaces you deserve!